Explore E5 Guitar Chord Shapes and Fingerings
Want a structured chord roadmap instead of jumping between pages?
Go to the full guitar chords tutorial.

Visualizing the E5 guitar chord across the fretboard unlocks its powerful potential for rock and metal. This essential power chord, also known as a '5' chord, is built on the fundamental intervals of the 1 (Root) and the 5 (Perfect Fifth), giving it a robust and driving sound. On the guitar, this translates to the notes E and B. Our interactive virtual fretboard allows you to see exactly where to place your fingers, explore different shapes, and even verify your playing accuracy with real-time mic feedback. Dive in and start experimenting with its spatial layout.
Power chords like the E5 guitar chord are the backbone of countless rock, punk, and metal riffs, delivering a distinct, heavy sound when amplified with distortion. Their simplicity, being composed solely of the Root and the Fifth, makes them incredibly versatile for songwriting and performance. To deepen your understanding of these crucial building blocks, explore our comprehensive Power Chords tutorial. If you're interested in the underlying principles of how notes and intervals form chords, our Chord Construction guide offers valuable insights.
Below, you'll find various E5 guitar chord diagrams, arranged from the most straightforward to more advanced voicings, along with comprehensive theory and practical applications in songs across different keys. We encourage you to first utilize our interactive tool above to visually explore and understand the unique fretboard geometry of each E5 guitar chord shape before committing them to memory. Experiment with these shapes and discover how they feel under your fingers.
The E power chord is also written as E5, E(no 3rd) or E(omit 3).
Notes in the E 5 chord:
How to create the Powerchord chord:
E 5 Guitar Chord Diagrams
Position 1 Open
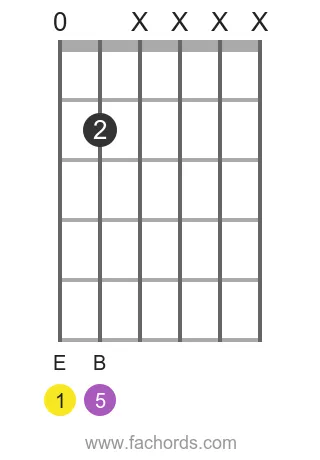
Finger Positions
- Let the low E string play without pressing any fret
- Mute the D string
- Mute the G string
- Mute the B string
- Mute the high E string
- Place your middle finger (2) on the fret 2 of the A string
Position 2 Movable
Finger Positions
- Mute the low E string
- Mute the G string
- Mute the B string
- Mute the high E string
- Place your index finger (1) on the fret 7 of the A string
- Place your ring finger (3) on the fret 9 of the D string
Position 3 Movable

Finger Positions
- Mute the D string
- Mute the G string
- Mute the B string
- Mute the high E string
- Place your index finger (1) on the fret 12 of the low E string
- Place your ring finger (3) on the fret 14 of the A string
Position 4 Open

Finger Positions
- Let the low E string play without pressing any fret
- Mute the G string
- Mute the B string
- Mute the high E string
- Place your index finger (1) on the fret 7 of the A string
- Place your ring finger (3) on the fret 9 of the D string
Position 5 Movable

Finger Positions
- Mute the low E string
- Mute the B string
- Mute the high E string
- Place your index finger (1) on the fret 7 of the A string
- Place your ring finger (3) on the fret 9 of the D string
- Place your pinky finger (4) on the fret 9 of the G string
Position 6 Movable

Finger Positions
- Mute the low E string
- Mute the A string
- Mute the high E string
- Place your index finger (1) on the fret 2 of the D string
- Place your ring finger (3) on the fret 4 of the G string
- Place your pinky finger (4) on the fret 5 of the B string
Position 7 Movable

Finger Positions
- Mute the G string
- Mute the B string
- Mute the high E string
- Place your index finger (1) on the fret 12 of the low E string
- Place your ring finger (3) on the fret 14 of the A string
- Place your pinky finger (4) on the fret 14 of the D string
Position 8 Open

Finger Positions
- Let the low E string play without pressing any fret
- Mute the G string
- Let the B string play without pressing any fret
- Let the high E string play without pressing any fret
- Place your middle finger (2) on the fret 2 of the A string
- Place your ring finger (3) on the fret 2 of the D string
Position 9 Open

Finger Positions
- Let the low E string play without pressing any fret
- Mute the B string
- Mute the high E string
- Place your index finger (1) on the fret 7 of the A string
- Place your ring finger (3) on the fret 9 of the D string
- Place your pinky finger (4) on the fret 9 of the G string
Position 10 Barre Movable

Finger Positions
- Mute the low E string
- Mute the A string
- Mute the B string
- Mute the high E string
- Place your index finger (1) on the fret 9 of the D and G strings at the same time
Position 11 Barre Open

Finger Positions
- Let the low E string play without pressing any fret
- Mute the G string
- Mute the B string
- Mute the high E string
- Place your middle finger (2) on the fret 2 of the A and D strings at the same time
Position 12 Open

Finger Positions
- Let the low E string play without pressing any fret
- Let the B string play without pressing any fret
- Let the high E string play without pressing any fret
- Place your index finger (1) on the fret 7 of the A string
- Place your ring finger (3) on the fret 9 of the D string
- Place your pinky finger (4) on the fret 9 of the G string
Position 13 Barre Movable

Finger Positions
- Mute the G string
- Mute the B string
- Mute the high E string
- Place your index finger (1) on the fret 7 of the low E and A strings at the same time
- Place your ring finger (3) on the fret 9 of the D string
Position 14 Barre Open

Finger Positions
- Let the low E string play without pressing any fret
- Mute the high E string
- Place your index finger (1) on the fret 2 of the A and D strings at the same time
- Place your ring finger (3) on the fret 4 of the G string
- Place your pinky finger (4) on the fret 5 of the B string
 Find more shapes in our all guitar chords online library. If you
prefer a printable pdf, download
the Free Guitar Chords Chart Pdf

Created by
Giancarlo is a musician (teaching guitar since 2000), software engineer, AI consultant and published researcher
FAQ
What is an E5 power chord?
The E5 power chord is a fundamental type of '5' chord, characterized by its robust and powerful sound. It belongs to the power chord family, which forms the backbone of many musical genres like rock, punk, and heavy music.
What specific notes make up the E5 chord?
The E5 chord is composed of just two notes: E and B. The 'E' is the Root note, and the 'B' is the Perfect Fifth interval above it.
Why are power chords like E5 called '5' chords?
Power chords are known as '5' chords because they are constructed using only two specific musical intervals: the 1 (Root) and the 5 (Perfect Fifth). The '5' in the name directly refers to the inclusion of the Perfect Fifth interval.
What musical intervals are used to build the E5 power chord?
The E5 power chord is built using two essential musical intervals: the 1 (Root) and the 5 (Perfect Fifth). These specific intervals are what define all power chords.
How does the E5 power chord typically sound, and in which music genres is it often found?
The E5 power chord has a distinctively robust and powerful sound. Due to this characteristic, it is a staple in various musical genres, particularly rock, punk, and heavy music, where it often forms the core of guitar riffs and progressions.