Learn the D7(#11) Chord: Theory and Interactive Practice
Want a structured chord roadmap instead of jumping between pages?
Go to the full guitar chords tutorial.
The D7(#11) chord, a distinct member of the Dominant Chords family, is fundamentally built upon a specific interval structure. It is composed of the notes D, F#, A, C, and G#, corresponding to the intervals 1 (Root), 3 (Major Third), 5 (Perfect Fifth), b7 (Minor Seventh), and #11 (Augmented Fourth). Understanding this precise arrangement is key to grasping its unique harmonic signature. Our interactive fretboard tool allows you to explore these voicings visually and audibly, providing instant chord playback. For accurate execution, practice with real-time mic feedback to confirm you are hitting each note perfectly, while the integrated drum machine helps maintain your rhythm.
Mastering the D7(#11) requires a deep understanding of its extended harmony. The #11, or Augmented Fourth, introduces a distinctive tension that pushes beyond a standard dominant seventh chord, making it a staple in jazz and fusion. Recognizing how each interval, from the Root to the Augmented Fourth, contributes to the overall sound is crucial for proper execution and musical application. For a foundational perspective on how these complex harmonies are assembled, explore our guide on chord construction. Furthermore, understanding the broader family of dominant chords will illuminate the D7(#11)'s role in creating sophisticated harmonic movement.
Before diving into the detailed chord diagrams, ranked from the simplest voicings to the most challenging, we encourage you to spend time with the interactive fretboard above. Experiment with different positions and hear the D7(#11) chord come to life. This hands-on exploration will reinforce the theoretical concepts you've learned and prepare you to integrate this advanced chord, often found in jazz and contemporary songs, into your own musical repertoire across various keys. Consistent and disciplined practice with our tools is the most effective path to mastering the D7(#11).
Notes of the D 7(#11) chord:
How to create the Dominant Seventh Sharp Eleventh Added chord:
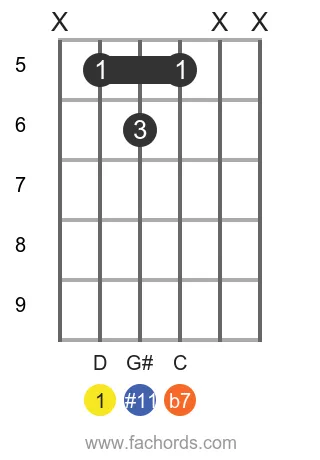
D7(#11) Guitar Chord Diagrams
Position 1
Movable
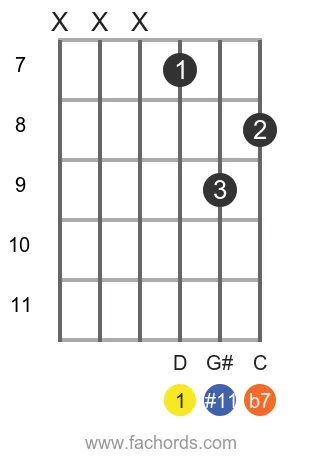
Position 2
Movable
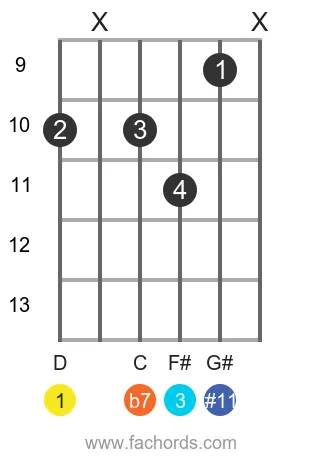
Position 3
Barre
Movable
 Find more shapes in our all guitar chords online library. If you
prefer a printable pdf, download
the Free Guitar Chords Chart Pdf
Find more shapes in our all guitar chords online library. If you
prefer a printable pdf, download
the Free Guitar Chords Chart Pdf
You can also use this accessible D7(#11) chord page, with written diagram instructions and screen-reader support for blind users.

Created by
Giancarlo is a musician (teaching guitar since 2000), software engineer, AI consultant and published researcher
FAQ
What is a D7(#11) chord on guitar?
The D7(#11) is a dominant chord that adds a unique color to your playing. It is composed of the notes D, F#, A, C, and G#, built using the intervals Root (1), Major Third (3), Perfect Fifth (5), Minor Seventh (b7), and Augmented Fourth (#11).
What makes the D7(#11) chord a 'Dominant Chord'?
The D7(#11) is classified as a dominant chord due to the presence of the minor seventh (b7) interval in its construction. This interval, combined with the major third (3), creates the characteristic tension found in dominant chords.
What are the specific notes that make up a D7(#11) chord?
The D7(#11) chord is composed of five distinct notes: D (Root), F# (Major Third), A (Perfect Fifth), C (Minor Seventh), and G# (Augmented Fourth).
What do the intervals 1, 3, 5, b7, and #11 mean in the D7(#11) chord?
In the D7(#11) chord, each interval has a specific name: 1 is the Root, 3 is the Major Third, 5 is the Perfect Fifth, b7 is the Minor Seventh, and #11 is the Augmented Fourth. Understanding these intervals is crucial for grasping the chord's structure.
Why is the #11 interval also referred to as an 'Augmented Fourth'?
The #11 interval is specifically called the Augmented Fourth because it represents an Augmented Fourth (#4) that has been extended or played up an octave. It adds a higher extension and distinct color to the chord.
What gives the D7(#11) chord its unique sound?
The distinctive sound of the D7(#11) chord primarily comes from the inclusion of the #11 (Augmented Fourth) interval. This particular interval creates a rich, slightly dissonant, and sophisticated harmonic texture that sets it apart.
Is the D7(#11) considered an advanced chord for guitarists?
Yes, the D7(#11) is indeed described as a more advanced chord. Mastering this chord is a significant step forward for guitarists aiming to enhance their harmonic understanding and playing complexity.
In which musical genres is the D7(#11) chord commonly found?
The D7(#11) chord is commonly found in genres like jazz. Its advanced and colorful sound makes it a staple for adding sophisticated harmony and unique voice leading in jazz compositions.