Visual Ear Training
Using Your Eyes And Body To Improve Aural Skills
Many aural perception and interval training exercises utilise the ears only.
Whilst this makes complete sense, given the fact that you are training your ears, one huge point that’s often missing is how your eyes can help train your ears and become widely beneficial in developing accuracy with interval recognition and ear training as a whole.
There are also many exercises that reference particular songs in order to outline specific intervals (Star Wars for perfect 5th etc).
Whilst this can be a good place to start, students can end up becoming reliant on these songs in order to identify intervals as opposed to fully absorbing them independently.
It’s very important to develop full independence when hearing intervals in order to apply your skills to real life situations.
To give you an example, you could be hired for many recording sessions over the years where even though you may have some time to prepare, things are often changed on the day with little notice, including the key, which means you would have to transpose intervals.
In these situations time is money, so you need to adjust quickly.
It’s real life situations like these which have led me to change my approach when teaching intervals by adding visual exercises as a tool to developing confidence and accuracy.
This approach is applied by physically drawing or visualising shapes in your head as you hear a specific set of intervals.
A good example of this is to draw or visualise a set of steps as the intervals are being played and relate each movement you’re making to the order of pitch being played.
Is the next note higher or lower than the last?
This will determine the direction of which the steps are drawn.
If the intervals are ascending you will draw the steps moving up or moving down if the intervals are descending.
Students of mine have had great success through application of these exercises, especially when drawing out steps or shapes as the information is then processed in three ways through listening, visualising and physically drawing shapes in relation to the intervals being played.
Please see a couple of examples below:
The first example is based on a set of intervals ascending up a major scale to the fifth degree and then descending back down to the route.
Example two descends from the fourth back down to the route.
Listen to audio samples one and two to hear how these examples translate to the shapes below:

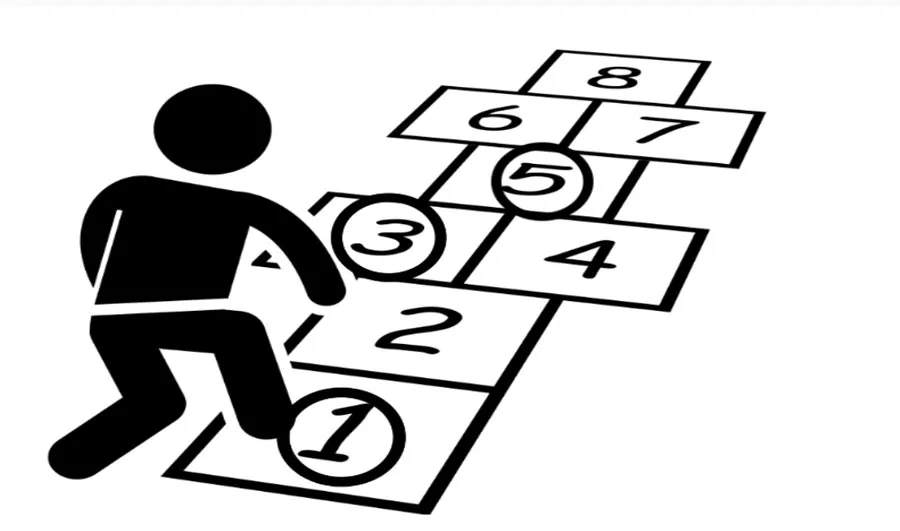
Intervallic Hopscotch
The first visual exercise of drawing steps to describe intervallic movement is very useful when the intervals are moving consecutively, however when jumps of more than one tone are introduced, we need a more suitable exercise to accommodate bigger jumps.
Let me introduce our new game intervallic hopscotch!
This games involves drawing out the hopscotch game and circling the intervals you hear.
In the past when working in schools my younger students have actually enjoyed playing hopscotch using this idea as a musical activity.
Give it a try but watch out for any big jumps!
Below is an example of this exercise being applied after hearing the intervals route, third and fifth.
Listen to audio sample three to hear how this translates to represent the numbers circled below.
Octave Ping Pong
Whilst there are many exercises that focus primarily on ascending and descending intervals above the root note not many pay much attention to the octave below.
This is why I created another game I call octave ping pong.
To play this game play or sing the root note of the key you are working on, followed by a chosen interval above, then repeat the root note and play/sing the same interval an octave below.
Application of this exercise on the guitar will develop your awareness of the fretboard whilst becoming familiar with how the intervals sound in both directions.
It’s also important to consider that the intervallic distance from the root will be different below the octave than above.
For example the distance of the major 3rd ascending from the root is two tones, but descending from the root is down a major 6th.
Awareness of this enhances creativity on the guitar when you want to repeat a lick, motif or idea in a different octave or a mixture of two creating some octave displacement.
The visual part of this exercise is to write down how each interval relates to the root intervallically on both octaves and gradually commit these to memory.
Please see an example below of how intervals relate to the root note in both octaves.
Please listen to samples A to F to hear how these intervals translate.
Major scale intervals the octave below the root:
A) Root to 2nd is down a minor 7 (b7)
B) Root to major 3rd is down a major 6th
C) Root to 4th is down a 5th
D) Root to 5th is down a 4th
E) Root to major 6th is down a minor 3rd (b3)
F) Root to major 7th is down a semitone
You might also find useful this ear training game, where you can see the intervals displayed on a virtual fretboard.
This ear training tutorial ends here. To stay updated, subscribe here for free.

Created by
Giancarlo is a musician (teaching guitar since 2000), software engineer, AI consultant and published researcher
FAQ
Why is visual ear training more effective than traditional ear-only methods?
Traditional ear training, especially when relying on specific songs for interval recognition, can lead to students becoming overly dependent on those examples rather than fully internalizing the sounds. Visual ear training, on the other hand, engages multiple senses, listening, visualizing, and even physically drawing shapes, which helps process information more deeply, leading to greater accuracy and independence in recognizing intervals in real-life musical situations.
When should I use the 'drawing steps' exercise versus 'Intervallic Hopscotch' for ear training?
The 'drawing steps' exercise is best suited for intervals moving consecutively, like steps in a scale (e.g., ascending or descending notes one by one). 'Intervallic Hopscotch' is designed for recognizing larger, non-consecutive jumps between intervals. If you're hearing bigger leaps between notes that aren't adjacent, hopscotch helps you visualize and circle those specific, larger intervallic movements more effectively.
Does visual ear training lead to reliance on visuals instead of truly developing my ear?
No, the primary goal of this visual approach is to develop full independence in hearing and identifying intervals. By integrating listening with visualizing and physical drawing, you engage more cognitive pathways, leading to a deeper and more robust understanding. This multi-sensory processing is designed to prevent the kind of reliance that can occur when ear training is solely dependent on memorizing specific song examples for certain intervals.
Why are the intervallic distances different when playing an interval below the root compared to above it in 'Octave Ping Pong'?
The intervallic distances are different because you are measuring the relationship from the root note in an opposite direction. For instance, while a major 3rd *above* the root is two whole steps up, to reach that same pitch class an octave *below* the root, you would descend a major 6th from the root. This distinction highlights how the intervallic relationship to the root changes depending on the direction and octave, which is vital for comprehensive fretboard understanding and creative melodic construction.