Bb9 Guitar Chord | Play, Hear and Practice Interactively
Want a structured chord roadmap instead of jumping between pages?
Go to the full guitar chords tutorial.
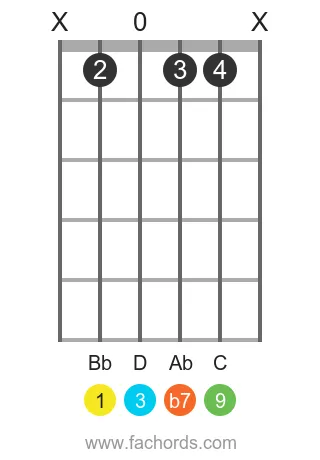
The Bb9 chord, a fascinating member of the Dominant Ninth family, is built from the notes Bb, D, F, Ab, and C. These correspond to the intervals Root (1), Major Third (3), Perfect Fifth (5), Minor Seventh (b7), and Major Ninth (9). Unlock the full potential of this chord with our interactive fretboard tool at the top of this page. You can visualize every fingering, listen to the chord played as a strum or arpeggio, and instantly check your accuracy with real-time microphone feedback.
The Bb9 chord adds a rich, jazzy flavor that's common in blues, funk, and jazz progressions, building on the tension of a dominant seventh with an added ninth. To understand its construction, delve into our guide on Ninth Chords and how they relate to the broader Dominant Chord family. For a deeper dive into the theory behind building any chord, explore our Chord Construction tutorial. Many Bb9 shapes involve barre forms; our Guitar Bar Chords guide can help you master them for smoother playing.
Below, you'll discover over 20 Bb9 chord diagrams, ranked from the easiest open positions to more advanced movable barre shapes. We'll also dive into the music theory behind the chord, common songs where it shines, and the keys where it naturally appears. Before you scroll down to these static resources, we highly recommend spending some time with the interactive tool above. Set a comfortable tempo with the drum & BPM practice tool, strum the chord, and let the mic feedback guide your hand. This hands-on, immediate practice is the most effective way to internalize the Bb9 chord and truly make it your own.
Bb dominant 9th guitar chord is also written as Bb9, Bbdom9, Bb7(9) or Bb7add9.
Notes that compose the Bb 9 chord:
Chord formula for the Dominant Ninth chord:
Bb 9 Guitar Chord Diagrams
Position 1 Movable
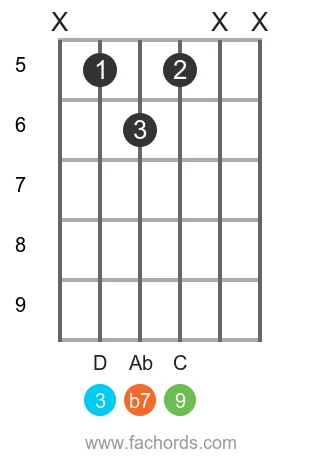
Finger Positions
- Mute the low E string
- Mute the B string
- Mute the high E string
- Place your index finger (1) on the fret 5 of the A string
- Place your middle finger (2) on the fret 5 of the G string
- Place your ring finger (3) on the fret 6 of the D string
Position 2 Movable
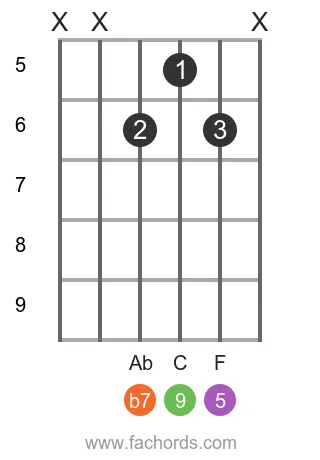
Finger Positions
- Mute the low E string
- Mute the A string
- Mute the high E string
- Place your index finger (1) on the fret 5 of the G string
- Place your middle finger (2) on the fret 6 of the D string
- Place your ring finger (3) on the fret 6 of the B string
Position 3 Open
Finger Positions
- Mute the low E string
- Let the D string play without pressing any fret
- Mute the high E string
- Place your middle finger (2) on the fret 1 of the A string
- Place your ring finger (3) on the fret 1 of the G string
- Place your pinky finger (4) on the fret 1 of the B string
Position 4 Movable
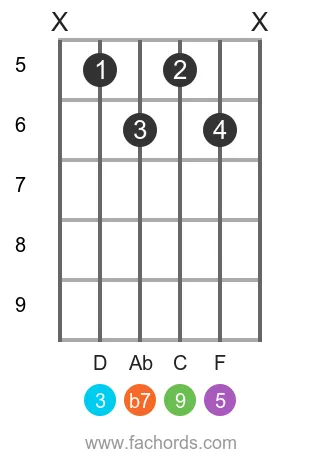
Finger Positions
- Mute the low E string
- Mute the high E string
- Place your index finger (1) on the fret 5 of the A string
- Place your middle finger (2) on the fret 5 of the G string
- Place your ring finger (3) on the fret 6 of the D string
- Place your pinky finger (4) on the fret 6 of the B string
Position 5 Movable
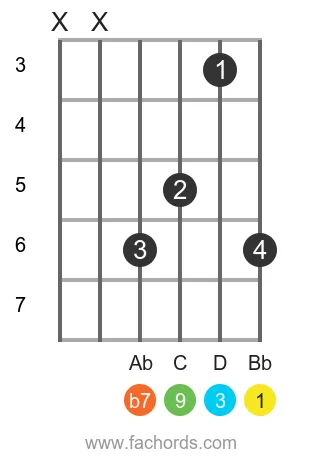
Finger Positions
- Mute the low E string
- Mute the A string
- Place your index finger (1) on the fret 3 of the B string
- Place your middle finger (2) on the fret 5 of the G string
- Place your ring finger (3) on the fret 6 of the D string
- Place your pinky finger (4) on the fret 6 of the high E string
Position 6 Movable
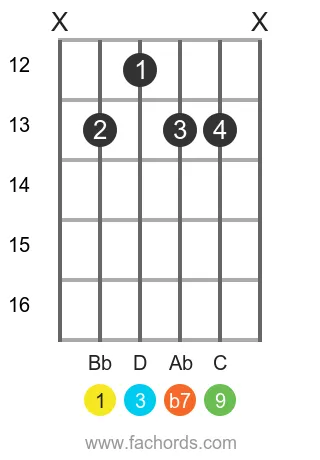
Finger Positions
- Mute the low E string
- Mute the high E string
- Place your index finger (1) on the fret 12 of the D string
- Place your middle finger (2) on the fret 13 of the A string
- Place your ring finger (3) on the fret 13 of the G string
- Place your pinky finger (4) on the fret 13 of the B string
Position 7 Barre Open
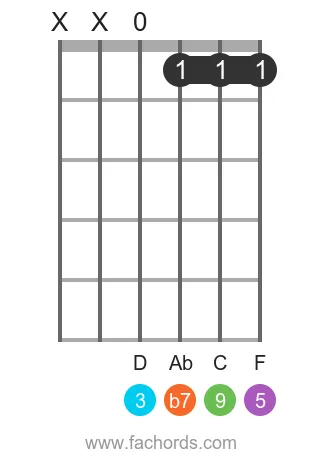
Finger Positions
- Mute the low E string
- Mute the A string
- Let the D string play without pressing any fret
- Place your index finger (1) on the fret 1 of the G, B and high E strings at the same time
Position 8 Barre Movable
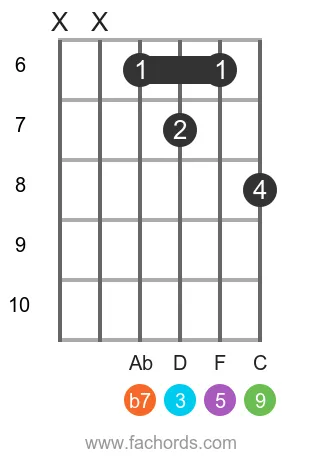
Finger Positions
- Mute the low E string
- Mute the A string
- Place your index finger (1) on the fret 6 of the D and B strings at the same time
- Place your middle finger (2) on the fret 7 of the G string
- Place your pinky finger (4) on the fret 8 of the high E string
Position 9 Barre Movable
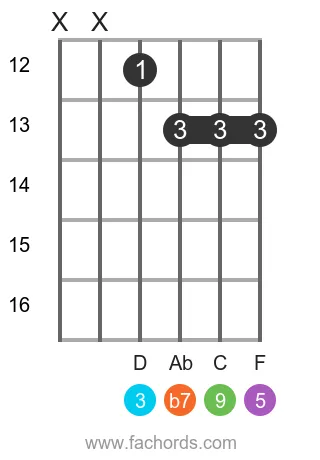
Finger Positions
- Mute the low E string
- Mute the A string
- Place your index finger (1) on the fret 12 of the D string
- Place your ring finger (3) on the fret 13 of the G, B and high E strings at the same time
Position 10 Barre Movable
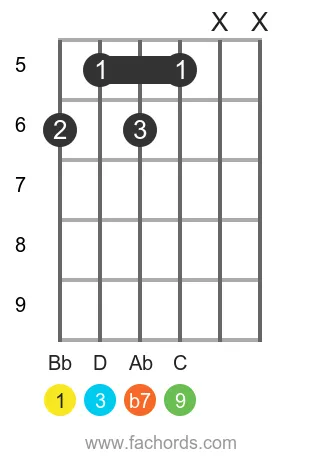
Finger Positions
- Mute the B string
- Mute the high E string
- Place your index finger (1) on the fret 5 of the A and G strings at the same time
- Place your middle finger (2) on the fret 6 of the low E string
- Place your ring finger (3) on the fret 6 of the D string
Position 11 Barre Open
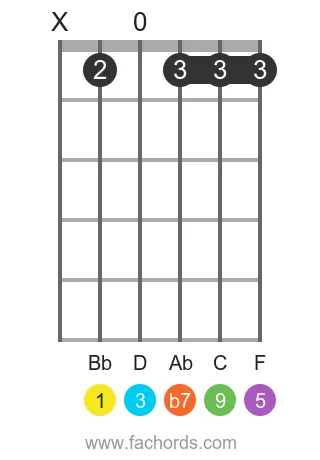
Finger Positions
- Mute the low E string
- Let the D string play without pressing any fret
- Place your middle finger (2) on the fret 1 of the A string
- Place your ring finger (3) on the fret 1 of the G, B and high E strings at the same time
Position 12 Barre Movable
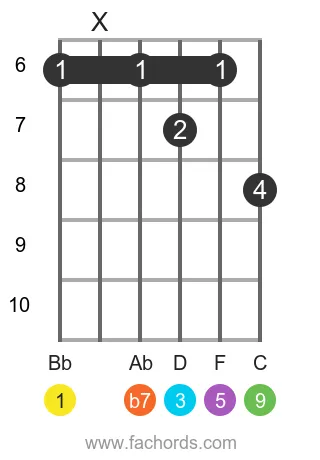
Finger Positions
- Mute the A string
- Place your index finger (1) on the fret 6 of the low E, D and B strings at the same time
- Place your middle finger (2) on the fret 7 of the G string
- Place your pinky finger (4) on the fret 8 of the high E string
Position 13 Barre Movable
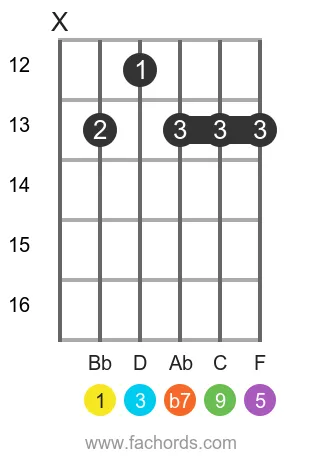
Finger Positions
- Mute the low E string
- Place your index finger (1) on the fret 12 of the D string
- Place your middle finger (2) on the fret 13 of the A string
- Place your ring finger (3) on the fret 13 of the G, B and high E strings at the same time
Position 14 Barre Movable
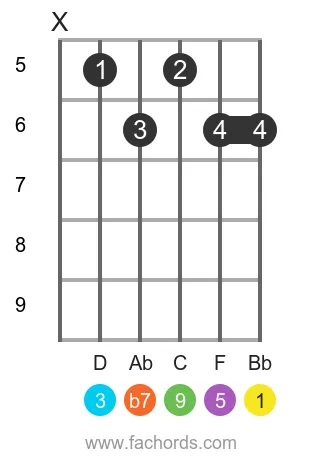
Finger Positions
- Mute the low E string
- Place your index finger (1) on the fret 5 of the A string
- Place your middle finger (2) on the fret 5 of the G string
- Place your ring finger (3) on the fret 6 of the D string
- Place your pinky finger (4) on the fret 6 of the B and high E strings at the same time
 Find more shapes in our all guitar chords online library. If you
prefer a printable pdf, download
the Free Guitar Chords Chart Pdf

Created by
Giancarlo is a musician (teaching guitar since 2000), software engineer, AI consultant and published researcher
FAQ
What are the specific notes that form the Bb9 chord?
The Bb9 chord is comprised of five distinct notes: Bb, D, F, Ab, and C.
What do the numbers 1, 3, 5, b7, and 9 represent in the context of the Bb9 chord?
These numbers represent the intervals from the root note (Bb) that make up the chord. Specifically, 1 is the Root (Bb), 3 is the Major Third (D), 5 is the Perfect Fifth (F), b7 is the Minor Seventh (Ab), and 9 is the Major Ninth (C).
Why is the Bb9 chord considered a 'Dominant Chord'?
The Bb9 chord belongs to the Dominant Chords family because it includes a minor seventh interval (b7) combined with a major third (3), which creates a specific harmonic tension typically used to lead or resolve to other chords in a progression.
Is the Bb9 chord suitable for beginner guitarists?
No, the Bb9 chord is considered a more advanced chord. It goes beyond the scope of beginner guitar lessons and is best approached once a guitarist has a solid grasp of basic and intermediate chord structures.
In what musical styles is the Bb9 chord typically used?
As a dominant chord, the Bb9 is frequently employed in a variety of musical styles. You'll commonly find it in genres such as blues, jazz, funk, and many other contexts where its distinctive sound and harmonic function are desired.