Guitar Bar Chords
7 Tips For Playing Bar Chords Easy
Sometimes it is spelled " Bar Chord " other times " Barre Chord ", but either way it is spelled, it is a hassle to play.
Let's face it: barre chords are not easy, actually are a real pain in the ass, there I said it.
Anyone who went beyond beginner chords and has struggled with learning bar chords understands the need for profanity.
Anyway, all joking aside let's get into some tips on how to properly master this technique.
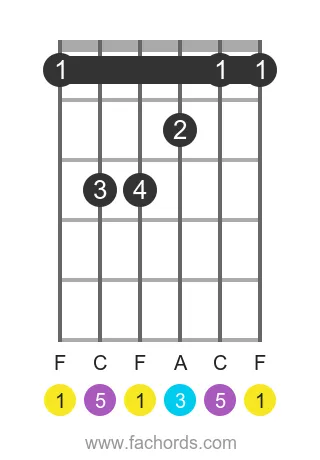
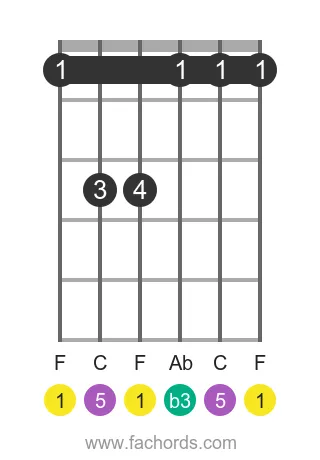
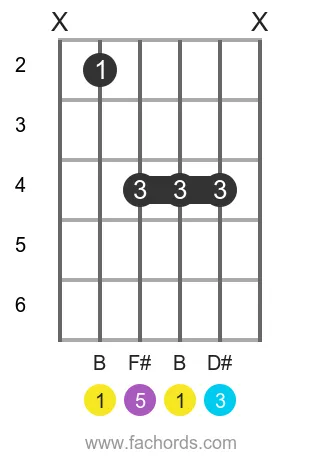
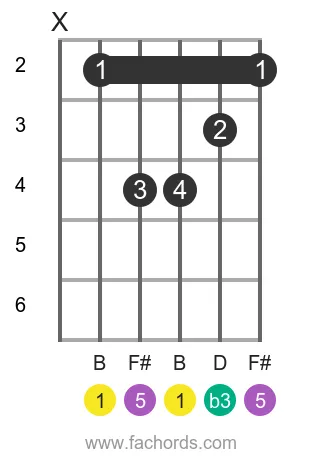
Common Bar Chord Shapes
Here below you find the diagrams for the 4 most used bar chord shapes , with root on the E low string and A low string. It's helpful to know is that bar chord are movable , that means that you can shift the same shape up and down the neck, without changing finger positions, to play chords with another root.
If you move the F major shape 1 fret up at a time, you'll play: F maj, then F# maj, then G maj and so forth.
7 Tips That Will Help You With Bar Chords
1. Practice, and don't give up
I have had many students claim their fingers weren't long enough, or too stubby, or bent wrong, when in reality it is always about finger strength.
It takes a long time to strengthen the fingers enough to do proper barres, especially the F chord.
If a student doesn't spend enough time practicing barres the fingers will never be strong enough .
It seems so simple, yet it is the truth. Barre chords need practiced over and over, it will hurt, cause sore fingers, and will not be easy.
Unfortunately, many students do not want to hear this, but it is a fact.
You must build your finger strength up!
2. Begin practicing bar chords at the middle of the neck
String tension is higher at the lowest frets .
he first fret is always the hardest, which is why the F barre chord is so difficult.
It's better to start at higher frets, and descend gradually while your strength improves.
To practice a barre chord:
- Go to the 7th fret and press all strings down with your index finger.
- Make sure every string can be played without any buzzing or dead strings
- Slowly adjust your wrist, grip, and finger until all strings are pushed down and once it sounds right, hold it in place.
- After a few seconds relax your finger and push again, pretend you are in a gym doing reps of an exercise, be sure to give your finger a break in between reps.
When you get better at the 7th fret start going down slowly to the first fret and making sure all strings are pressed down at the same time.
It may take time to get good enough that you can press all the 1st fret strings down with your index finger.
3. Assume proper posture
You should use a guitar position with the easiest leverage.
The neck should point up and forward, in order to have your left hand (or right, if you are a left-handed guitarists) in line with your shoulder. Roll the guitar away from you in a way you can't see the fretboard.
With this position your fingers and wrist will be more relaxed
Be careful that the position can vary a lot depending on you're playing seated down or stand.
Experiment by moving the fretting hand and the elbow, and find a position that requires less force.
4. Use the bony part of the index finger, and pay attention to its creases
The creases in your finger between the links are the reason why strings buzz.
Try to shift the finger a little bit, to avoid creases on a string
Also, roll your index finger toward the headstock about 30 degrees .
In this way is the bony part of the finger that presses the strings.
This part is less soft than the flat part and pushes the strings more effectively, with less effort.
Lastly, position the index finger right up against the fret where you're making the barre.
5. Place the thumb at the back of the neck
Make sure that the thumb is placed at the back of the neck, perpendicular to it.
Then move the thumb a little bit until you find a position that makes you feel the pressure on fingers, wrist and forearm lighter.
6. Be sure that your guitar is properly set up
One bit of good news, is that the better the action on your guitar is, the easier barre chords are.
It is usually easier to barre an electric than an acoustic guitar because acoustics have higher action.
This is why it was so important in the beginning to buy a guitar that is not a cheap mass produced hunk of junk.
The are ways to improve action on a guitar, if possible do it, because poor action or a badly bowed guitar can make a barre chord impossible.
In fact, check you action now, if it is really bad, I would advise not to push yourself too far on barring chords less you may hurt your hand.
7. Use lighter strings
Along with the action of a guitar it is also important to pay attention to string gauge .
Heavier strings are not the best to learn on.
It is wise to restring your guitar with light gauge strings when learning to first barre chords.
Basically you want the strings and action to be as easy as possible to press down with your index finger.
Once you've built enough strength, you can mount heavier strings for a richer sound.
A Killer Exercise to improve your bar chords
Hold your index finger down on the 7th fret , with the 3 other fingers start picking patterns.
Choose a string and play one fret with the middle finger, one with the ring, and another with the pinky.
Do not be too concerned about what notes are played, the key is to stretch your fingers and get them in shape.
Always be careful when stretching and take it slow. Especially with the Pinky it is possible to injure your fingers.
This process can take many weeks to get your fingers moving right, be sure not to rush.
As you get better start picking specific notes.
For example, if you play the normal E chord shape at the 3rd bar you will have a G chord .
Once your fingers have been stretched out start picking the specific notes of this chord shape.
(Some people even with many years of experience have trouble using their pinky, so don’t feel bad if you still have trouble with that digit).
Avoid Tricks Around Barre Chords
There are many tricks and tips on how to play barre chords without barring all 6 strings, I originally learned the F barre chord using a partial fingering .
While it helped me at the time, I wish I had done it correctly in the first place.
Knowing how to properly barre a chord is very helpful as your playing advances, so it is best to get it right initially.
Remember if you want to be a great guitar player, you will always be better if you have practiced properly and perfectly.
(Yes there are some situations where partial barres come in handy, but when initially learning the barre chord, it is imperative to strengthen the fingers).
Guitar Bar Chords: Conclusions
Now you should know how to play a bar chord: hand positioning, string gauge, action, and tuning will only get you so far.
At the end of the day practice and time are essential to barre chords.
Its not an easy road, I wish there were some magic fix that I could share, but alas it is a lot of work.
Remember to practice often and perfectly, give your hand rest (maybe skip barres every other day at first if they bother you), and stick with it.
Too many students give up, when in reality everyone can do it with enough practice!
If you need a song for practicing bar chords, try Tell Me Something Good by Rufus and Chaka Khan.
Suggested Resources:
- Free Guitar Chords Chart : this pdf contains lots of bar chord shapes that you can include in your daily practice.
- Online Chord Dictionary : an online resource with more than 5000 chord diagrams in any part of the fretboard.
To stay updated on new tutorials and get free downloadable resources, subscribe here

Created by
Giancarlo is a musician (teaching guitar since 2000), software engineer, AI consultant and published researcher
FAQ
Why are barre chords so challenging for guitarists?
Barre chords are challenging primarily because they demand significant finger strength and endurance, especially in the index finger. Beginners often struggle with buzzing or dead strings due to insufficient pressure and improper technique, which takes time and consistent practice to develop.
What does it mean for a bar chord to be 'movable' and how does it work?
'Movable' means you can shift the same barre chord finger shape up and down the guitar neck, and it will produce different chords with different root notes. For example, moving an F major barre chord shape (rooted on the E string) up one fret changes it to an F# major, then G major, and so on, without altering your finger positions relative to the shape.
What is the correct way to position my index finger for a clear barre chord sound?
To achieve a clear sound, roll your index finger slightly towards the headstock (about 30 degrees) so you are pressing with the harder, bony side rather than the softer pad. Also, pay attention to the creases in your finger and adjust its position slightly to ensure no string falls into a crease, preventing buzzing. Position your index finger directly against the fret wire for optimal pressure and clarity.
Where should I start practicing barre chords on the guitar neck to make them easier?
Begin practicing barre chords higher up the guitar neck, specifically around the 7th fret. The string tension is lower at higher frets, making it easier to press down all the strings. As your finger strength improves, gradually work your way down the neck towards the first fret, where tension is highest.
How can my guitar's setup and string choice impact my ability to play barre chords?
Your guitar's 'action' (the height of the strings above the fretboard) significantly affects barre chords; lower action makes them easier. Electric guitars generally have lower action than acoustics, making them simpler for barre chords. Additionally, using lighter gauge strings reduces the force needed to press them down, making learning much easier. Once strength is built, you can consider heavier strings for a richer tone.
Are there specific exercises I can do to build the necessary strength for barre chords?
A highly effective exercise involves barring all strings at the 7th fret with your index finger. While maintaining the barre, use your other three fingers to pick individual notes or patterns on different strings and frets. This helps stretch and strengthen your fingers, improving their endurance and independence needed for proper barre chord formation. Remember to take breaks and avoid overexertion.
Is it okay to use partial barre chord fingerings when I'm first learning?
While partial barre fingerings might seem easier initially, it's strongly advised to focus on learning the full barre chord technique from the start. Mastering the full barre correctly builds essential finger strength and proper technique that will benefit your playing significantly as you advance. Partial barres can be useful in specific musical contexts later, but they can hinder foundational strength development if relied upon too early.