Master D#7(#9) Guitar Chord: Explore with Interactive Tools
Want a structured chord roadmap instead of jumping between pages?
Go to the full guitar chords tutorial.
Often heard in jazz and funk, the D#7(#9) chord delivers a complex, tension-building sound that adds a distinctive color to your music. This powerful dominant chord is constructed from the notes D#, F##, A#, C#, and E##, representing the intervals Root (1), Major Third (3), Perfect Fifth (5), Minor Seventh (b7), and Augmented Ninth (#9). Dive into its sonic character instantly with our interactive fretboard tool. You can visualize various fingerings, listen to it played as a strum or arpeggio, and use the real-time microphone feedback to verify your accuracy and refine your technique.
The D#7(#9) is a prime example of an extended dominant chord, crucial for creating rich harmonic tension that demands resolution. Understanding its role within the larger Dominant Chord family will illuminate its powerful function. The distinctive augmented ninth (#9) interval is what truly sets this chord apart, adding a bluesy or jazzy edge; delve deeper into this color tone with our guide on Ninth Chords. For a complete theoretical foundation on how chords are constructed and voiced, our Chord Construction resource is essential. As you integrate this complex chord into your playing, mastering fluid chord changes will be key to unlocking its full musical potential.
Below, you'll find a curated collection of D#7(#9) chord diagrams, progressing from fundamental open positions to versatile barre shapes. This section also explores advanced music theory insights, popular songs where this chord makes an impact, and its most effective musical keys. But before you dive into the diagrams and theory, we encourage you to truly *play* and *experience* the chord. Use the interactive tool above to set a tempo with the drum feature, hear the chord, and let the mic feedback confirm your precision. This active engagement is the best way to internalize its sound and feel.
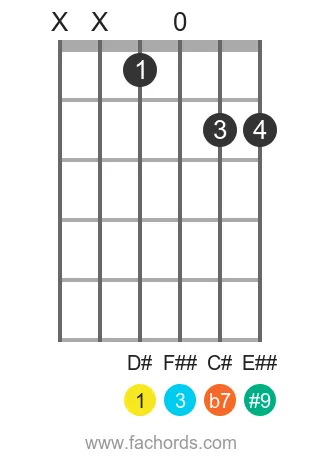
Notes of the D# 7(#9) chord:
Tones in the Dominant Seventh Sharp Ninth Added chord:
Guitar Patterns for the D# Dominant Seventh Sharp Ninth Added chord
Position 1
Open
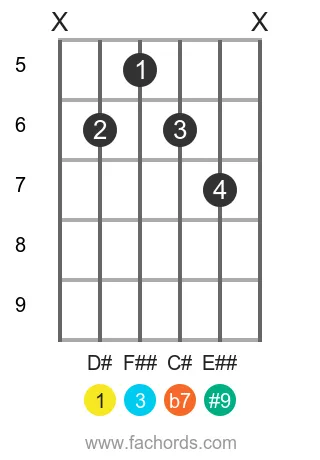
Position 2
Movable
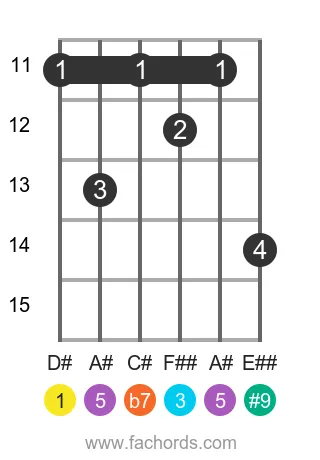
Position 3
Barre
Movable
 Find more shapes in our all guitar chords online library. If you
prefer a printable pdf, download
the Free Guitar Chords Chart Pdf
Find more shapes in our all guitar chords online library. If you
prefer a printable pdf, download
the Free Guitar Chords Chart Pdf
You can also use this accessible D#7(#9) chord page, with written diagram instructions and screen-reader support for blind users.
FAQ
What notes make up the D#7#9 guitar chord?
The D#7#9 chord is composed of five specific notes: D#, F##, A#, C#, and E##. These notes correspond to the Root, Major Third, Perfect Fifth, Minor Seventh, and Augmented Ninth intervals, respectively.
Why is the D#7#9 considered a Dominant Chord?
The D#7#9 belongs to the Dominant Chords family because it contains a minor seventh interval (b7). Dominant chords typically create tension that resolves to a tonic chord, a characteristic feature in many musical styles.
What do the '#9' and 'b7' intervals mean in the D#7#9 chord?
In the D#7#9 chord, the 'b7' (minor seventh) means the seventh note of the D# scale is lowered by a half step. The '#9' (augmented ninth) means the ninth note of the D# scale is raised by a half step, adding a distinctive, often dissonant, color to the chord.
What do the notes F## and E## represent in the D#7#9 chord?
F## (F double sharp) is enharmonically equivalent to G natural, and E## (E double sharp) is enharmonically equivalent to F# natural. These spellings are used to maintain the theoretical interval structure of the chord, ensuring each note represents a distinct scale degree (e.g., F## as the Major Third of D#).
When is the D#7#9 chord typically used in music?
The D#7#9 chord is often found in jazz chord progressions due to its complex and rich sound. It's a colorful dominant chord that adds tension and can lead to interesting harmonic movements.
Is the D#7#9 chord suitable for beginner guitarists?
The D#7#9 chord is considered more advanced than basic chords. It requires a good understanding of intervals, chord construction, and often more challenging fingerings. It's recommended that guitarists are comfortable with fundamental chords before tackling this one.