Practice the G7 Chord: Master Dominant Seven on Guitar
G7 is the G dominant seventh chord: G, B, D and F. Take a G major triad, add the F a minor seventh above the root, and you have it.
Of the 20 voicings listed for it, seven use open strings and three need a barre. It is the V7 chord of C major, so it often leads back to C. Soloists can reach for the G Mixolydian scale, since it contains all four chord tones.
Play the chord into your microphone and the page shows which strings ring and which ones are choked.
G dominant 7th guitar chord is also written as G7, Gdom7 or Gdom.
Notes in the G 7 chord:
How the Dominant Seventh chord is built:
Formula: 1 3 5 b7
G 7 Chord Interactive Fretboard
Want a structured chord roadmap instead of jumping between pages?
Go to the full guitar chords tutorial.
G 7 Guitar Chord Diagrams
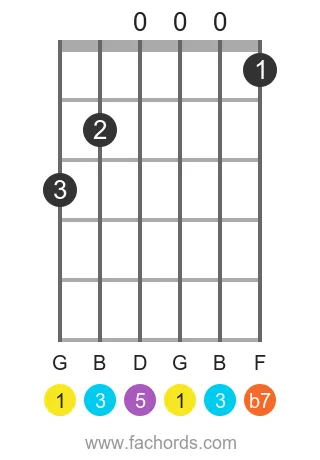
Position 1 Open
Finger Positions
- Let the D string play without pressing any fret
- Let the G string play without pressing any fret
- Let the B string play without pressing any fret
- Place your index finger (1) on the fret 1 of the high E string
- Place your middle finger (2) on the fret 2 of the A string
- Place your ring finger (3) on the fret 3 of the low E string
Position 2 Barre Movable
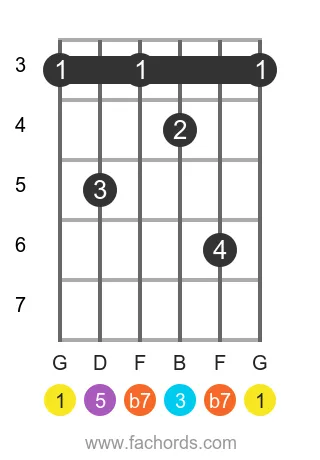
Finger Positions
- Place your index finger (1) on the fret 3 of the low E, D and high E strings at the same time
- Place your middle finger (2) on the fret 4 of the G string
- Place your ring finger (3) on the fret 5 of the A string
- Place your pinky finger (4) on the fret 6 of the B string
Position 3 Movable
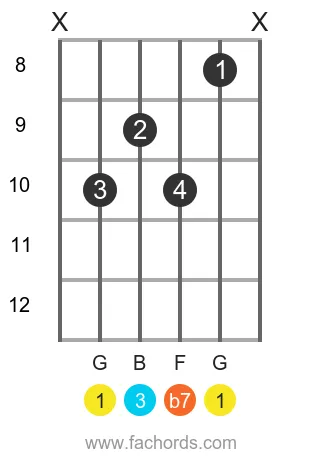
Finger Positions
- Mute the low E string
- Mute the high E string
- Place your index finger (1) on the fret 8 of the B string
- Place your middle finger (2) on the fret 9 of the D string
- Place your ring finger (3) on the fret 10 of the A string
- Place your pinky finger (4) on the fret 10 of the G string
Position 4 Open
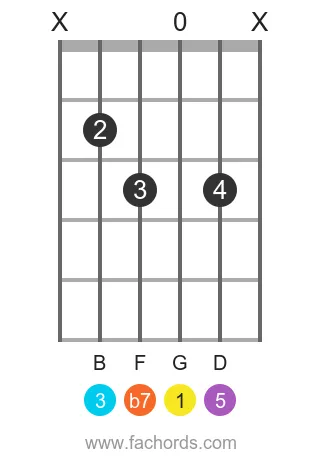
Finger Positions
- Mute the low E string
- Let the G string play without pressing any fret
- Mute the high E string
- Place your middle finger (2) on the fret 2 of the A string
- Place your ring finger (3) on the fret 3 of the D string
- Place your pinky finger (4) on the fret 3 of the B string
Position 5 Open
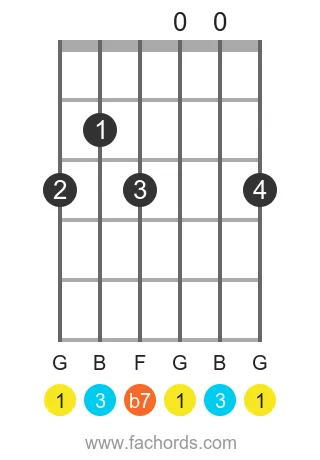
Finger Positions
- Let the G string play without pressing any fret
- Let the B string play without pressing any fret
- Place your index finger (1) on the fret 2 of the A string
- Place your middle finger (2) on the fret 3 of the low E string
- Place your ring finger (3) on the fret 3 of the D string
- Place your pinky finger (4) on the fret 3 of the high E string
Position 6 Open
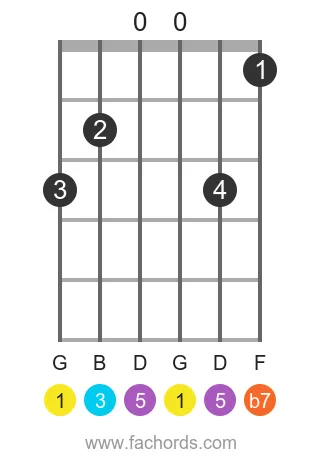
Finger Positions
- Let the D string play without pressing any fret
- Let the G string play without pressing any fret
- Place your index finger (1) on the fret 1 of the high E string
- Place your middle finger (2) on the fret 2 of the A string
- Place your ring finger (3) on the fret 3 of the low E string
- Place your pinky finger (4) on the fret 3 of the B string
Position 7 Open
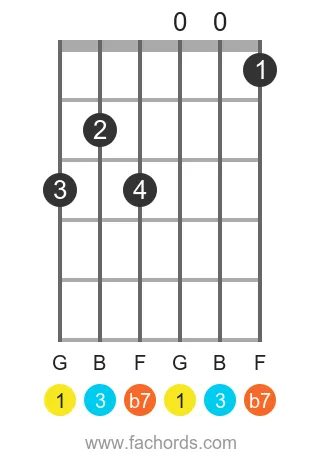
Finger Positions
- Let the G string play without pressing any fret
- Let the B string play without pressing any fret
- Place your index finger (1) on the fret 1 of the high E string
- Place your middle finger (2) on the fret 2 of the A string
- Place your ring finger (3) on the fret 3 of the low E string
- Place your pinky finger (4) on the fret 3 of the D string
Position 8 Movable
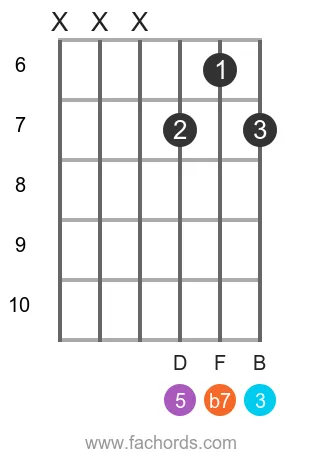
Finger Positions
- Mute the low E string
- Mute the A string
- Mute the D string
- Place your index finger (1) on the fret 6 of the B string
- Place your middle finger (2) on the fret 7 of the G string
- Place your ring finger (3) on the fret 7 of the high E string
Position 9 Open
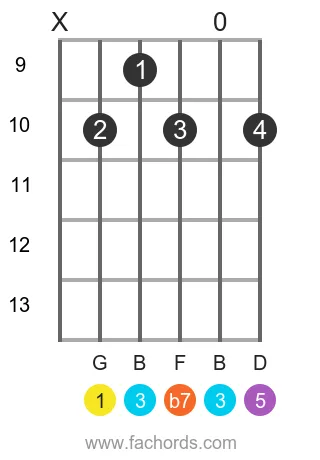
Finger Positions
- Mute the low E string
- Let the B string play without pressing any fret
- Place your index finger (1) on the fret 9 of the D string
- Place your middle finger (2) on the fret 10 of the A string
- Place your ring finger (3) on the fret 10 of the G string
- Place your pinky finger (4) on the fret 10 of the high E string
Position 10 Movable
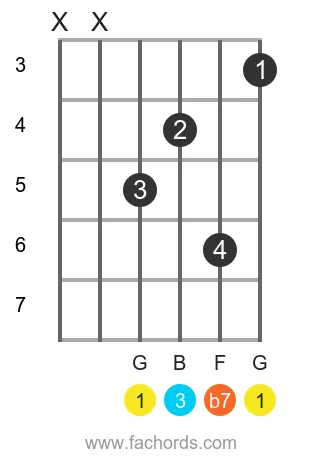
Finger Positions
- Mute the low E string
- Mute the A string
- Place your index finger (1) on the fret 3 of the high E string
- Place your middle finger (2) on the fret 4 of the G string
- Place your ring finger (3) on the fret 5 of the D string
- Place your pinky finger (4) on the fret 6 of the B string
Position 11 Barre Movable
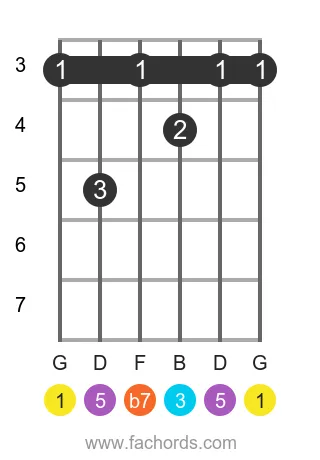
Finger Positions
- Place your index finger (1) on the fret 3 of the low E, D, B and high E strings at the same time
- Place your middle finger (2) on the fret 4 of the G string
- Place your ring finger (3) on the fret 5 of the A string
Position 12 Movable
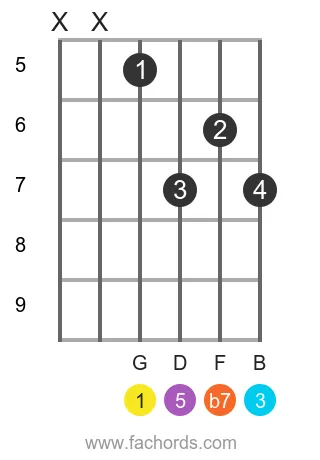
Finger Positions
- Mute the low E string
- Mute the A string
- Place your index finger (1) on the fret 5 of the D string
- Place your middle finger (2) on the fret 6 of the B string
- Place your ring finger (3) on the fret 7 of the G string
- Place your pinky finger (4) on the fret 7 of the high E string
Position 13 Movable
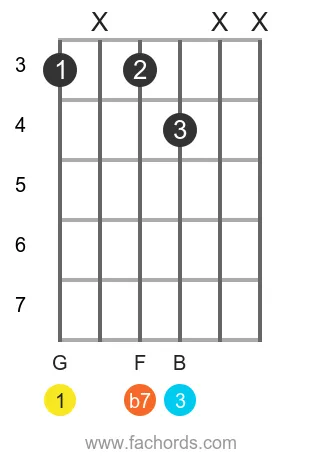
Finger Positions
- Mute the A string
- Mute the B string
- Mute the high E string
- Place your index finger (1) on the fret 3 of the low E string
- Place your middle finger (2) on the fret 3 of the D string
- Place your ring finger (3) on the fret 4 of the G string
Position 14 Movable
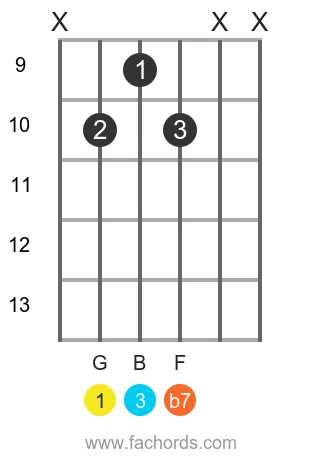
Finger Positions
- Mute the low E string
- Mute the B string
- Mute the high E string
- Place your index finger (1) on the fret 9 of the D string
- Place your middle finger (2) on the fret 10 of the A string
- Place your ring finger (3) on the fret 10 of the G string
Position 15 Open
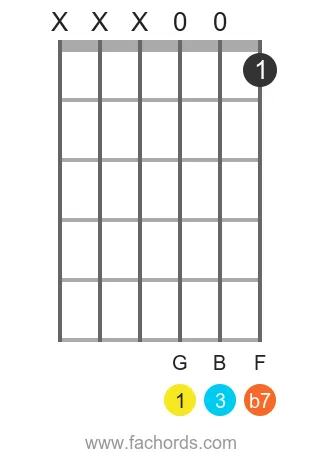
Finger Positions
- Mute the low E string
- Mute the A string
- Mute the D string
- Let the G string play without pressing any fret
- Let the B string play without pressing any fret
- Place your index finger (1) on the fret 1 of the high E string
Position 16 Movable
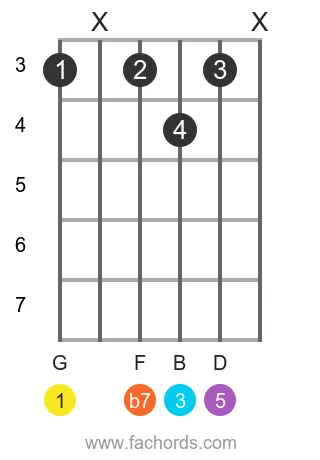
Finger Positions
- Mute the A string
- Mute the high E string
- Place your index finger (1) on the fret 3 of the low E string
- Place your middle finger (2) on the fret 3 of the D string
- Place your ring finger (3) on the fret 3 of the B string
- Place your pinky finger (4) on the fret 4 of the G string
Position 17 Movable
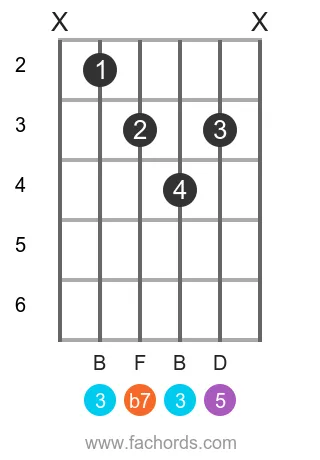
Finger Positions
- Mute the low E string
- Mute the high E string
- Place your index finger (1) on the fret 2 of the A string
- Place your middle finger (2) on the fret 3 of the D string
- Place your ring finger (3) on the fret 3 of the B string
- Place your pinky finger (4) on the fret 4 of the G string
Position 18 Barre Movable
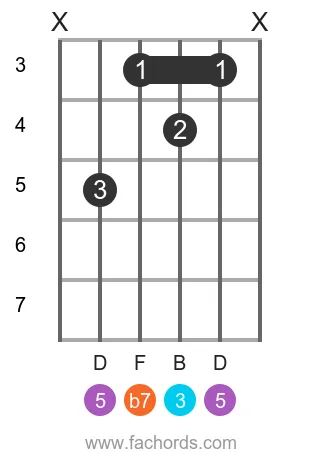
Finger Positions
- Mute the low E string
- Mute the high E string
- Place your index finger (1) on the fret 3 of the D and B strings at the same time
- Place your middle finger (2) on the fret 4 of the G string
- Place your ring finger (3) on the fret 5 of the A string
Position 19 Movable
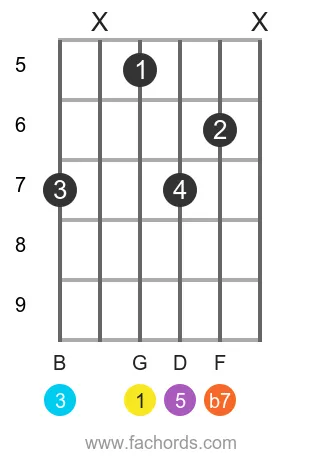
Finger Positions
- Mute the A string
- Mute the high E string
- Place your index finger (1) on the fret 5 of the D string
- Place your middle finger (2) on the fret 6 of the B string
- Place your ring finger (3) on the fret 7 of the low E string
- Place your pinky finger (4) on the fret 7 of the G string
Position 20 Movable
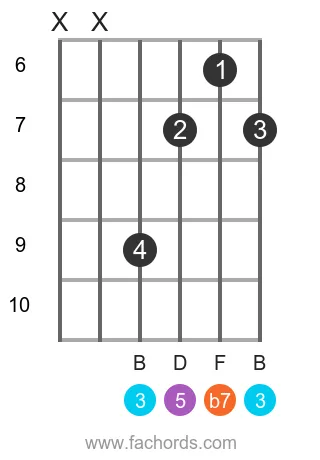
Finger Positions
- Mute the low E string
- Mute the A string
- Place your index finger (1) on the fret 6 of the B string
- Place your middle finger (2) on the fret 7 of the G string
- Place your ring finger (3) on the fret 7 of the high E string
- Place your pinky finger (4) on the fret 9 of the D string
 Find more shapes in our all guitar chords online library. If you
prefer a printable pdf, download
the Free Guitar Chords Chart Pdf

Created by
Giancarlo is a musician (teaching guitar since 2000), software engineer, AI consultant and published researcher
FAQ
What notes make up G dominant seventh?
G7 is G, B, D and F. The F is a minor seventh over G, and it is the only note beyond the G major triad.
In which key is G7 the V7 chord?
C major. G is the fifth degree of C major, and the F in the chord is its fourth degree, so G7 leads back to C.
How many G7 voicings are there?
There are 20 voicings, between fret 1 and fret 10. Seven of the voicings use open strings and three are barre voicings.
Which scale goes with G7?
G Mixolydian is G, A, B, C, D, E and F. It has all four chord notes, and it is the C major scale started from G.
What is the tritone inside G7?
B and F are six semitones apart, a tritone. This interval between the major third and the minor seventh is what makes the chord want to resolve.