Train A#7(b9) Guitar Chord: Interactive Practice & Theory
Want a structured chord roadmap instead of jumping between pages?
Go to the full guitar chords tutorial.
The A#7(b9) chord, a member of the Dominant Chords family, is constructed from the notes A#, C##, E#, G#, and B. These notes correspond to the intervals Root (1), Major Third (3), Perfect Fifth (5), Minor Seventh (b7), and Minor Ninth (b9), creating a rich, complex harmonic texture. To truly grasp its sound and feel on the fretboard, engage with our interactive fretboard tool at the top of the page. This tool allows you to visualize every possible fingering, hear the chord played as a strum or arpeggio, and receive immediate feedback on your accuracy through its real-time microphone detection.
This particular chord generates significant harmonic tension, characteristic of extended harmonies, and often demands a dramatic resolution, making it indispensable in jazz, funk, and R&B contexts. To delve deeper into its function within this crucial chord family, explore our guide on Dominant Chords. You can also uncover more about the specific construction and role of the ninth within such chords in our dedicated Ninth Chords tutorial. Understanding how these elements combine is key, so don't miss our comprehensive resource on Chord Construction. Given that many voicings of the A#7(b9) utilize barre shapes, our guide on Guitar Bar Chords can provide essential techniques for comfortable execution.
Below this section, you'll find comprehensive static content including detailed diagrams, arranged from the simplest open positions to the more challenging barre shapes, along with in-depth music theory, popular songs featuring the A#7(b9), and common keys where it typically appears. However, for efficient and disciplined practice, make the most of the interactive tool above. Use it to internalize the sound, refine your finger placement with accurate mic verification, and build a solid foundation for integrating the A#7(b9) into your playing repertoire.
Notes that compose the A# 7(b9) chord:
How the Dominant Seventh Flat Nine Added chord is built:
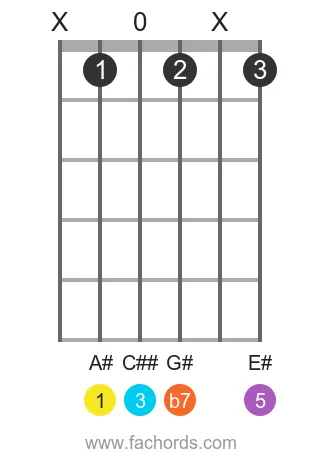
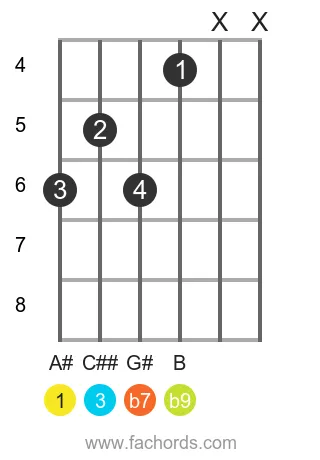
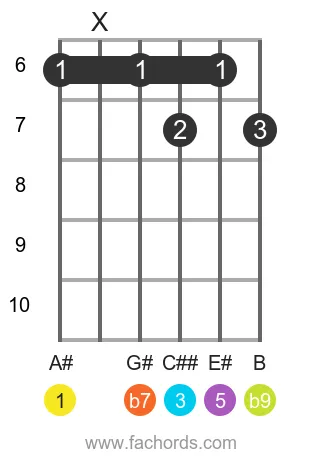
Guitar Patterns for the A#7(b9) chord
Position 1
Open
Position 2
Movable
Position 3
Barre
Movable
 Find more shapes in our all guitar chords online library. If you
prefer a printable pdf, download
the Free Guitar Chords Chart Pdf
Find more shapes in our all guitar chords online library. If you
prefer a printable pdf, download
the Free Guitar Chords Chart Pdf
You can also use this accessible A#7(b9) chord page, with written diagram instructions and screen-reader support for blind users.
FAQ
What are the specific notes that make up the A# 7(b9) chord?
The A# 7(b9) chord is composed of five distinct notes: A# (Root), C## (Major Third), E# (Perfect Fifth), G# (Minor Seventh), and B (Minor Ninth). These notes are derived from specific intervals relative to the root note, A#.
What does the '7(b9)' part of the A# 7(b9) chord name mean?
The '7(b9)' indicates the specific intervals added to the basic major triad. The '7' refers to the minor seventh interval, which is essential for classifying it as a dominant chord. The '(b9)' signifies the addition of a minor ninth interval, which is an extension that adds a distinct, often intense, quality to the chord.
Why is the A# 7(b9) classified as a Dominant Chord?
The A# 7(b9) is a Dominant Chord because it contains the minor seventh interval (G# relative to A#) in addition to its root, major third, and perfect fifth. Dominant chords are characterized by their inherent tension and strong tendency to resolve to another chord, creating musical movement and direction.
How do the intervals (1, 3, 5, b7, b9) define the structure of the A# 7(b9) chord?
These intervals are the fundamental building blocks that determine the chord's unique sound and structure. Starting from the root (1) A#, we add a major third (3) C##, a perfect fifth (5) E#, a minor seventh (b7) G#, and a minor ninth (b9) B. Each interval specifies the precise distance and quality of each note from the root, constructing the full chord.
What is the musical role or function of the A# 7(b9) chord in a progression?
As a dominant chord, the A# 7(b9) primarily functions to create tension that strongly pulls towards a resolution in a chord progression. The added minor ninth interval (b9) intensifies this tension, making it a powerful chord for creating dramatic harmonic interest and leading effectively into subsequent harmonies.
Why are notes like C## (double sharp C) and E# (sharp E) used in the A# 7(b9) chord?
The use of C## and E# ensures the correct theoretical spelling of the intervals relative to the root A#. Music theory dictates that intervals are spelled using consecutive letter names. C## represents the major third above A#, and E# represents the perfect fifth, maintaining accurate intervallic relationships without skipping or duplicating letter names, which would happen if enharmonic equivalents like D or F were used.