Practice D#7(b9): Get Instant Feedback & Master This Complex Chord
Want a structured chord roadmap instead of jumping between pages?
Go to the full guitar chords tutorial.
Ready to conquer the challenging D# 7(b9) chord? Our interactive fretboard is your personal trainer, offering real-time mic feedback to confirm your finger placement and ensure accuracy. This complex sound, part of the Dominant Chords family, is built from the notes D#, F##, A#, C#, and E, representing the intervals Root, Major Third, Perfect Fifth, Minor Seventh, and Minor Ninth. Visualize every fingering and listen to the chord played as a strum or arpeggio, making learning hands-on and immediate.
The D# 7(b9) chord, while advanced, is crucial for expanding your harmonic palette. Its distinctive tension, stemming from the altered ninth, makes it a cornerstone in genres like blues, jazz, and fusion. Understand its classification as a Dominant Chord and explore its richer structure within our Ninth Chords tutorial. For those interested in how such complex harmonies are built from the ground up, our Chord Construction guide provides essential insights. Once you've grasped this chord, refine your playing by mastering smooth chord changes to integrate it seamlessly into your music.
Below this introduction, you'll discover a thorough collection of D# 7(b9) chord diagrams, arranged from beginner-friendly open positions to challenging barre shapes. We'll also delve into deeper music theory, list popular songs featuring this chord, and highlight common keys where it appears. Before scrolling, make sure to engage with the interactive tool above. Utilize its drum and BPM feature to set a rhythm, play the chord, and let the real-time mic feedback verify your technique. Test yourself and build muscle memory – this hands-on practice is the most effective way to truly learn.
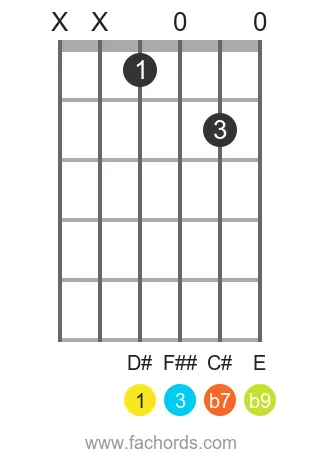
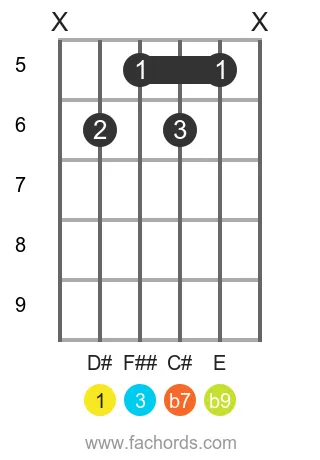
Notes of the D# 7(b9) chord:
Chord structure of the Dominant Seventh Flat Nine Added chord:
Guitar Patterns for the D# Dominant Seventh Flat Nine Added chord
Position 1
Open
Position 2
Barre
Movable
Position 3
Barre
Movable

 Find more shapes in our all guitar chords online library. If you
prefer a printable pdf, download
the Free Guitar Chords Chart Pdf
Find more shapes in our all guitar chords online library. If you
prefer a printable pdf, download
the Free Guitar Chords Chart Pdf
You can also use this accessible D#7(b9) chord page, with written diagram instructions and screen-reader support for blind users.

Created by
Giancarlo is a musician (teaching guitar since 2000), software engineer, AI consultant and published researcher
FAQ
What is the D# 7(b9) chord?
The D# 7(b9) is a complex and rich-sounding chord that belongs to the Dominant Chords family. It's an extended dominant chord characterized by a specific set of intervals.
What notes make up the D# 7(b9) chord?
The D# 7(b9) chord is composed of the notes D# (Root), F## (Major Third), A# (Perfect Fifth), C# (Minor Seventh), and E (Minor Ninth).
What musical intervals are used to build the D# 7(b9) chord?
The D# 7(b9) chord is built using the Root (1), Major Third (3), Perfect Fifth (5), Minor Seventh (b7), and Minor Ninth (b9) intervals.
Is the D# 7(b9) chord suitable for beginner guitarists?
The D# 7(b9) chord is not considered a beginner's chord due to its complexity. However, it's an excellent chord to learn as you progress in your guitar journey, opening up new musical possibilities.
How does the D# 7(b9) chord relate to other Dominant Chords?
The D# 7(b9) chord is a specific type of Dominant Chord, distinguished by its inclusion of both the minor seventh (b7) and minor ninth (b9) intervals. It's an extended dominant chord that adds color and tension within the dominant family.