Understand and Play the B 7(#9) Guitar Chord
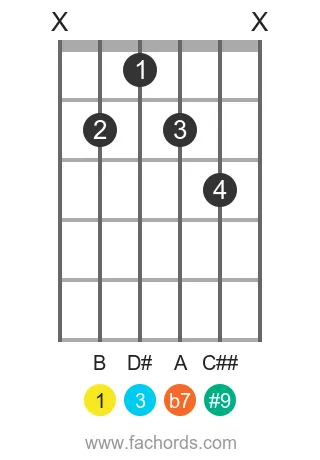
B7#9 (B seventh sharp nine) follows the formula 1, 3, 5, b7, #9, so on B it reads B, D#, F#, A and C##. It stacks a major third and a sharp ninth (C##) on the same root, a clash of major and minor that gives the chord its raw, bluesy edge.
Between fret 1 and fret 10, this page holds four voicings, and none of them uses an open string. When you improvise over this chord, try the B Half-Whole scale, the eight-note scale built from alternating half steps and whole steps, which covers all five chord tones.
The fretboard at the top labels every note of each shape, so you can see where B, D# and C## fall.
B 7th with sharp 9th guitar chord is also written as B7(#9), B7#9 or B7+9. It is also known as the Hendrix chord.
B 7(#9) chord Notes:
Chord Structure:
Formula: 1 3 5 b7 #9
B 7(#9) Chord Interactive Fretboard
Want a structured chord roadmap instead of jumping between pages?
Go to the full guitar chords tutorial.
B 7(#9) Guitar Chord Diagrams
Position 1 Movable
Finger Positions
- Mute the low E string
- Mute the high E string
- Place your index finger (1) on the fret 1 of the D string
- Place your middle finger (2) on the fret 2 of the A string
- Place your ring finger (3) on the fret 2 of the G string
- Place your pinky finger (4) on the fret 3 of the B string
Position 2 Barre Movable
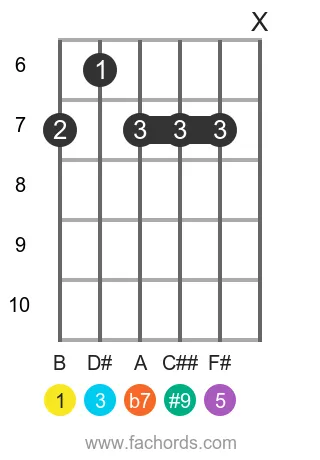
Finger Positions
- Mute the high E string
- Place your index finger (1) on the fret 6 of the A string
- Place your middle finger (2) on the fret 7 of the low E string
- Place your ring finger (3) on the fret 7 of the D, G and B strings at the same time
Position 3 Barre Movable
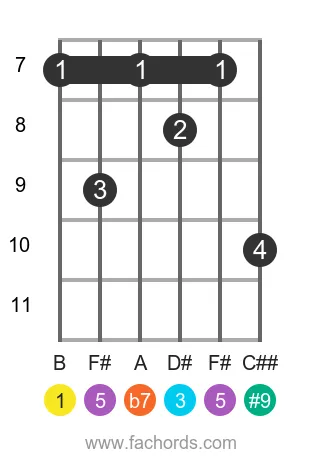
Finger Positions
- Place your index finger (1) on the fret 7 of the low E, D and B strings at the same time
- Place your middle finger (2) on the fret 8 of the G string
- Place your ring finger (3) on the fret 9 of the A string
- Place your pinky finger (4) on the fret 10 of the high E string
Position 4 Movable
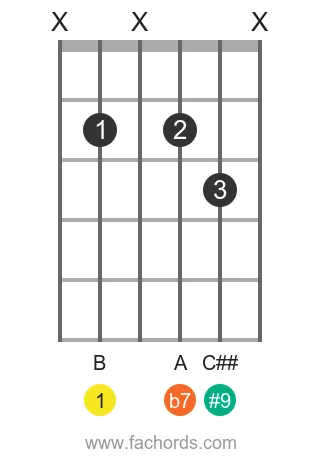
Finger Positions
- Mute the low E string
- Mute the D string
- Mute the high E string
- Place your index finger (1) on the fret 2 of the A string
- Place your middle finger (2) on the fret 2 of the G string
- Place your ring finger (3) on the fret 3 of the B string
 Find more shapes in our all guitar chords online library. If you
prefer a printable pdf, download
the Free Guitar Chords Chart Pdf

Created by
Giancarlo is a musician (teaching guitar since 2000), software engineer, AI consultant and published researcher
FAQ
Which notes are in B7#9?
B, D#, F#, A and C##. The first four form a B seventh chord, and C## is the sharp ninth. It sounds like D natural.
Why does B7#9 contain a C##?
The ninth uses the letter C, and the major ninth is C#. Raising it a half step for the sharp nine gives C##, which sounds like D natural.
How is B7#9 different from B7?
B7 contains B, D#, F# and A. B7#9 keeps them and adds C##, the sharp ninth, which sounds like a minor third from the root B. It makes the chord edgier.
What scale works over B7#9?
The B Half-Whole scale: B, C, C##, D#, E#, F#, G# and A. It has eight notes built from alternating half and whole steps and includes every chord tone.
How many ways can I play B7#9?
Four voicings are listed, from the first fret to the tenth fret. Two of them are barre voicings, and none of them uses open strings.